Thursday, January 22

Error: Request for the permission of type ' ' failed in SharePoint

MOSS 2007 and Code Access Security

Have you ever written a web part or a web service? If yes then you must have dealt with a security problem. Writing a web part or web service may not be a big issue but deploying them is certainly a headache. You start getting permission errors as soon as you deploy your code on the server.

There are three ways to assign execution permissions to your code:

1. Increase the trust level for the entire virtual server
2. Create a custom policy file for your assemblies
3. Install your assemblies in the GAC

In the article, we installed our assembly in the GAC but the safest method is to create a custom policy file for the assembly.

For security reasons, the assembly must be installed in the bin directory of the application instead of GAC but installing it in the bin directory requires you to assign execution permissions to the assembly. One way is to increase the trust level of the entire virtual server. This is easy to implement but this option is least secure as it affects all assemblies used by that virtual server. Second way is to create a custom policy file and this is the recommended approach. This option is most secure but difficult to implement. In this article, we will create a custom policy file for an assembly (web service assembly) written for MOSS 2007.

Creating a Custom Policy File

1. Go to the following location on the server:

LocalDrive:\Program Files\Common Files\Microsoft Shared\web server extensions\12\CONFIG

2. Make a copy of wss_minimaltrust.config and rename it wss_customtrust.config.

3. Open wss_customtrust.config file using any text editor.

4. Under the element, add a reference to the SharePointPermissions class as follows:


5. Search for the tag where the name attribute equals ASP.NET. If you couldn't find that tag, locate the one that has SPRestricted in the name attribute.

6. Copy the entire tag and all of its children, and paste a copy of it immediately below the one you copied.

7. Change the name of the PermissionSet element from ASP.NET (or SPRestricted) to CustomTrust.

Before:


After:


8. Add the following node to the element where the name attribute equals CustomTrust:


Therefore, the resulting customized will look as follows:


9. Once you define the customized element, you must create a code group to specify when the CLR should apply the permission set. (For details, see the original Microsoft article). Locate tag where the class attribute equals FirstMatchCodeGroup and copy following CodeGroup immediately below it:


The membership condition for this new code group is based on URL membership and the URL points to the bin directory. The permissions will be applied to all the assemblies in the bin directory of the current application. You can also use strong name membership but then the permissions will be applied only to one assembly. For example, if I have written a web service and I wanted to assign permissions to my assembly only, I would use strong name membership. Copy following code immediately below the tag where the class attribute equals FirstMatchCodeGroup, if you want to use strong name membership:


Replace PublicKeyBlob value with your own value and change the name of the assembly in the Name attribute. Name attribute contains the name of the assembly. To retrieve the public key blob for an assembly, use the secutil.exe tool. Please note that publickeyblob is different from publickeytoken. Secutil.exe is located in the following folder:

LocalDrive:\Program Files\Microsoft Visual Studio 8\SDK\v2.0\Bin

To retrieve the public key blob for your assembly, either copy the secutil.exe tool to the folder that contains your assembly else provide exact path to the assembly in the command, and run the tool as follows:

secutil.exe -hex -s UploadService.dll > blob.txt

UploadService.dll is the name of the assembly. This command will create a text file named blob.txt. Open blob.txt and copy the public key and paste it in the publickeyblob attribute.

10. Save and close the file. The policy file is ready to use.

11. Open the web.config file for the virtual server where you have deployed your component and add the following tag to the SecurityPolicy element:


Virtual Directories for web applications are located in the following folder:

LocalDrive:\Inetpub\wwwroot\wss\VirtualDirectories

Suppose I want to deploy my web service in the web application configured at port 17316. The URL of that application would be http://localhost:17316 and its virtual directory will be:

LocalDrive:\Inetpub\wwwroot\wss\VirtualDirectories\17316

Create a bin folder in this path and copy your assembly to the bin folder. The web.config for this virtual server will be located in the following folder:

LocalDrive:\Inetpub\wwwroot\wss\VirtualDirectories\17315

In the web.config file, change the tag so that it refers to the newly defined trust level.


12. Save and close the web.config file.

13. Restart IIS to apply the custom policy to the specified virtual server.

Webpart option in Visual Studio 2008

The official way to develop MOSS 2007 WebParts is to work on a Windows Server 2003 with at least WSS 3.0 installed or to use a similar VPC environment. In the VPC case this means you need to have at least 2 GB of memory available, in order to spend 1 – 1.5 GB for the Sharepoint Server VPC.

Setting up the Developer Workstation:

1. You need a Windows XP SP2 or Windows Vista Machine with Visual Studio 2005 installed.

2. Install all Updates from Windows Update including Service Pack 1 for Team Suite or Service Pack 1 for Express Editions. If you run on Vista install the Service Pack 1 Update for Vista

3. You can optionally install WSS SDK an Office Server SDK also on your Workstation

4. Locate the Sharepoint Templates installed on the server environment and copy them to your Workstation User Templates. You have to navigate to:
“C:\Program Files\Microsoft Visual Studio 8\Common7\IDE\ProjectTemplates\CSharp”
and copy the whole Sharepoint Directory to your user Templates Folder on your Workstation. The Path is normally:
“C:\Users\\Documents\Visual Studio 2005\Templates\ProjectTemplates\Visual C#”.

If you want to develop in VB.NET do the same for the Sharepoint Folder in:
“C:\Program Files\Microsoft Visual Studio 8\Common7\IDE\ProjectTemplates\VisualBasic”

And copy it to:
“C:\Users\\Documents\Visual Studio 2005\Templates\ProjectTemplates\Visual Basic”

Do the same for the Sharepoint Folders in the ItemTemplates Directory. There is only one for CSharp. Navigate to:
“C:\Program Files\Microsoft Visual Studio 8\Common7\IDE\ItemTemplates\CSharp”

And copy the Sharepoint Folder to:
“C:\Users\\Documents\Visual Studio 2005\Templates\ItemTemplates\Visual C#”

5. Copy the complete Folder “Microsoft Sharepoint Developer Tools”, which can be found in “C:\Program Files” on the Server or VPC to your Workstation machine in the same location.

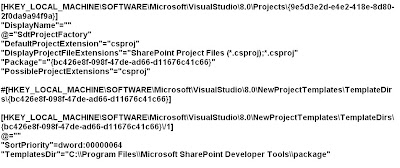
6. In order to register the Projects, Packages and Templates on you Workstation machine you have to add several registry keys to your Registry. Here is the whole stuff, just copy and paste it in a text file and save it with a *.reg extension:


Double click the *.reg File or import it using Regedit. In order to load the new package file, you maybe must start Visual Studio from the command line with the option /ResetSkipPkgs. Start a Command Window (on Vista this should run as an administrator) and navigate to:

“C:\Progarm Files\Microsoft Visual Studio 8\Common7\IDE”

And start Visual Studio via the following command:

Devenv /ResetSkipPkgs

Now you should be able to create new Sharepoint Projects like WebParts. To doublecheck this, in Visual Studio 2005 navigate to the Menu File->New->Project the Dialog Box should look like this:


Now select the Web Part and click Ok. Visual Studio should create the appropriate Project Files. If you click on References in the Solution Explorer you will see that there is an unresolved reference to the “Microsoft.Sharepoint” Assembly. So you can not yet build the WebPart or other Sharepoint Projects on the Workstation. Therefore the next 2 steps are necessary.

7. The Sharepoint Assemblies (DLLs) are located in the following Folder on the Sharepoint Server Installation:

“C:\Program Files\Common Files\Microsoft Shared\web server extensions\12\ISAPI”

I copied the complete folder to the same location on my Workstation, but you can also only copy the assemblies, which start with “Microsoft.Sharepoint.*” to any folder on your Workstation.

8. In order that Visual Studio can automatically resolve the references you should add the assemblies to the Global Assembly Cache” (GAC). You can use the command line tool gacutil.exe or use the “Microsoft .NET Framework 2.0 Configuration” which can be found through navigating to Control Panel, then select “Administrative Tools”.

9. Now you should be able to generate and build Sharepoint Server 2007 related projects on a remote Workstation.

Tuesday, January 20

Custom Webpart in SharePoint

I am going to explain step by step process:

1. First of all we need to create a webpart in visual studio (2005, 2008). For that, Go to File>> New>>Project.


2. Under Templates section select WebPart (this option is available only in 2008). For VS 2005, select Class Library and add reference for System.Web.


3. Write code WebPart you want to create. Here, code is written for a label having text “Hello World”.

using System;
using System.Runtime.InteropServices;
using System.Web.UI;
using System.Web.UI.WebControls;
using System.Web.UI.WebControls.WebParts;
using System.Xml.Serialization;
using Microsoft.SharePoint;
using Microsoft.SharePoint.WebControls;
using Microsoft.SharePoint.WebPartPages;
namespace CustomWebPart
{
[Guid("b8f18240-bc27-4f08-a03f-61bd44279d1a")]
public class WebPart1 : System.Web.UI.WebControls.WebParts.WebPart
{
public WebPart1()
{
}
protected override void CreateChildControls()
{
base.CreateChildControls();
Label label = new Label();
label.Text = "Hello World";
this.Controls.Add(label);
}
}
}


4. Now, Buid Webpart and generate an assembly for this webpart. For that GoTo>>Build>>Build Solution. And the GoTo>>Build>>CustomWebPart.


The WebPart is now Build, we need to deploy this assembly in sharepoint site. For deploying webpart we need to perform following steps.

5. Put the assembly in the bin folder of sharepoint site. The MOSS 2007 creates every portal in the inetpub\wwwroot\wss folder. To find the path of bin folder of the portal for which you want to deploy the webpart, identified with port number, run inetmgr(IIS).

Right Click the portal and click on Properties


6. Under HomeDirectory tab, Local Path describes the whole path, copy the path and verify it by opening it in a browser and see if the bin folder exists, if it does not exist then create a new folder and rename it bin.


7. Now copy the assembly from project output folder.
C:\Documents and Settings\Administrator\My Documents\Visual Studio 2008\Projects\CustomWebPart\CustomWebPart\bin\Debug.
Paste it in the portal bin folder. C:\Inetpub\wwwroot\wss\VirtualDirectories\80\bin


Now everytime we change the webpart we need to copy and paste the assembly in portal bin folder. Hence to avoid this stuff we can do the following step which will automatically replace the new assembly in the portal bin folder.

8. In VS .Net, Solution Explorer, Right Click the project name(CustomWebPart) Click on Properties, click on Build. Into the Output Path paste the path which we copied from inetmgr console.


9. Now to make the webpart usable we need to modify the web.config file of the portal. To declare the control safe we need to add a entry in web.config file.


10. For tag we require a parameter “PublicTokenKey” to generate this key drag the assembly from project folder and drop it in C:/Windows/assembly folder and it will generate a publictokenkey.


Right Click on CustomWebPart and copy Public Key Token.
Open web.config file and enter the following text :

.....
.....
Namespace="CustomWebPart" TypeName="*" Safe="True"
AllowRemoteDesigner="True" />


11. Now we need to Configure Portal to use CustomWebPart.
Till now the web part has been created and deployed to the site directory. Now the next part is how to use the web part on the Portal’s Site. The web part created can be placed on any site of the portal.
Open the portal site in the internet explorer, in my case its http://win2003, ensure that the logged in user has the administrative rights on the portal site, else it will not allow adding the web part.

12. Click on the Site Action>>Site Settings


13. On the site settings page under Galleries column click on the Web Parts.


14. On the Web Part Gallery Page click on the New button, to add the new web part assembly to the gallery.


15. On the New Web Parts page locate the CustomWebPart in the list, check the check box on the left and click on the Populate Gallery button the top of the page. This will result in the Web Part entry creation in the Web Part Gallery list, and hence it can be used from now on from the gallery.


Now the Web Part is ready to be added to the page.

16. Open a site created in the Portal. Click on Site Action>>Edit Page


17. This will modify the appearance of the page to enable the edit view. In this view Web Part Zones are highlighted so that a user can add a web part to the zone, Click on the Add a Web Part button in the left zone to add the Web Part.


18. Select the CustomWebPart from the web part list . It is found under the Miscellaneous section and then click on Add.


19. Click on the Exit Edit Mode link on the page and the site will return to the view mode.
20. At the end the page will appear like this.